Help Center
Product Categories carousel
The shortcode [product_categories] displays the category loop in the default grid mode.
Follow the steps to transform the grid into a carousel

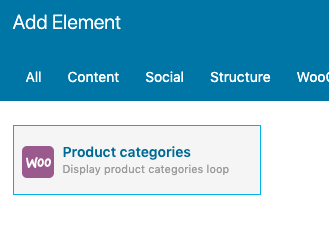
1. Insert a Product Categories element
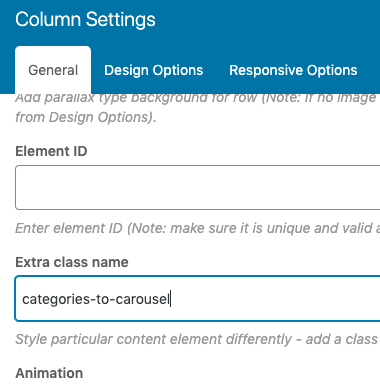
2. Add the class categories-to-carousel to the column where the Product Categories element was just added.
3. Paste this function to /wp-content/themes/goya-child/functions.php
add_action( 'wp_footer', 'categories_to_slider' );
function categories_to_slider() {
?>
<script>
jQuery(document).ready(function($) {
$args = {
slidesToShow: 4,
slidesToScroll: 4,
prevArrow: '<a class="slick-prev">'+ goya_theme_vars.icons.prev_arrow +'</a>',
nextArrow: '<a class="slick-next">'+ goya_theme_vars.icons.next_arrow +'</a>',
responsive: [{
breakpoint: 768,
settings: {
slidesToShow: 2,
slidesToScroll: 2,
}
}]
}
$('.categories-to-carousel .et-main-products').slick($args);
});
</script>
<?php
}Code language: JavaScript (javascript)You can adjust the number of columns for desktops and mobiles. Use your preferred values.
4. Add this CSS code to Appearance > Customize > Additional CSS or the child theme style.css
.categories-to-carousel .slick-slide {
 padding: 0 15px;
}
@media only screen and (min-width: 576px) {
 .categories-to-carousel .slick-slider:hover .slick-prev {
  left: -35px;
 }
 .categories-to-carousel .slick-slider:hover .slick-next {
  right: -35px;
 }
}Code language: CSS (css)